Practice management
How to Use Email Templates in Hushmail
Estimated reading time: 4 minutes
Email templates can help save time, reduce errors, and enhance your professionalism. That’s why Hushmail has built a tool that allows you to create and store pre-populated templates for frequently sent emails.
Hushmail templates are fully customizable and easy to access. You can write your own, use a pre-written template, or convert any email into a template.
For more on Hushmail’s email template tool and how to use it, read on!
|
Table of Contents |
Accessing email templates in Hushmail
If email templates are included in your Hushmail plan, you will see a folder named “Templates” on the left-hand side of the screen when you sign in to Hushmail. If you already have Hushmail but don’t see this folder, you may need to switch to a different plan.
Clicking the “Templates” folder will bring you to the main templates screen.
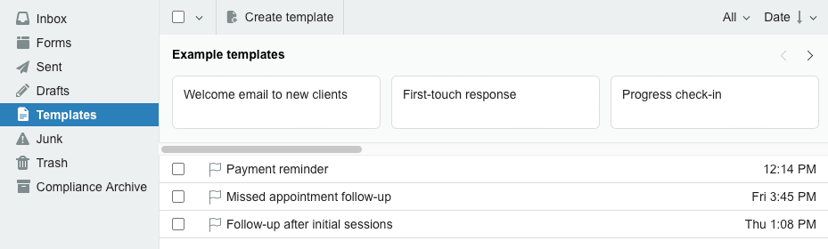
This is your home base for managing and editing templates. From here, you can:
- Create a new email template
- View saved templates
- Access the template directory (under “Example templates”)
- Edit your templates
- Send emails
Writing an original email template
Composing an email template is like writing an email. You simply open a blank template, type and format the text, then add photos, forms, or other attachments. You can also cut and paste text from other documents into the template. All formatting (e.g., font, bullet points) and attachments will be retained once the template is saved.
If your template includes text that must be customized before the email is sent, mark it with a placeholder (usually highlighted by brackets or written in capital letters).
For example, the beginning of a client welcome email might look like this:
Hi [NAME],
Welcome to our practice!
For more tips (and inspiration) on writing email templates, check out our Must-have email templates for your small healthcare practice article.
Creating an original template
Ready to create a template? Follow these steps.
- From the main templates screen, click on “Create template”
- Give the template a unique name by editing the “Name” field
- Write the email content
- Add any images and attachments
- Save the template
|
⚠️ If you have a default signature on your email settings, don’t add one to the template. Your signature will be added automatically when emails are sent. |
Adding email addresses to a template
With Hushmail templates, you can save email addresses in the “To,” “CC,” or “BCC” fields. Although it is not common practice to add email addresses to templates, it can be helpful in some instances. Be sure to exercise caution, though. If you add an email address to a template, it will appear every time it is used.
If, for example, you frequently email a medical biller with a specific type of client information, you could create a template with that biller’s address saved in the “To” field.
Alternatively, if you want to ensure another team member is always copied on a billing reminder, you could add their email to either the “CC” or “BCC” field.
Converting an email into a template
You don’t have to write all your templates from scratch. You can also convert an email into a template, making it easier and faster to build your template library. Here is the process.
- Go to the folder containing the email you want to convert
- Hover over or click on the email
- Use the “Move” button to put the email in the “Templates” folder
- The email will automatically become a template called “New template”
- Open the template and select "Edit"
- Rename the template using the “Name” field
- Edit the template accordingly (👉 remember to delete any unwanted recipients, forms, attachments, or signatures) and save it
Using the email template directory
Another great way to create an email template without staring down a blank screen is to use Hushmail’s template directory.
This repository of professionally written templates covers everyday situations in small to medium-sized healthcare practices.
You can find these templates at the top of the “Templates” folder, under “Example templates”. Just click on one to open a preview.
If you're happy with the template, you can start using it right away. Or keep reading to learn how to edit it!
Follow these steps to access a template from the directory:
- Click on any template in the “Example templates” list
- You will see a preview of the template
- Click “Get this template”
- Edit or send the template
Editing an email template
You can edit a template by opening it from the templates list (found below “Example templates”).
You can edit any part of the template, including the subject, text, attachments, and any saved recipients.
👉 To personalize a template before emailing it, see the “Preparing to send a template” section.
To edit a template, use this process:
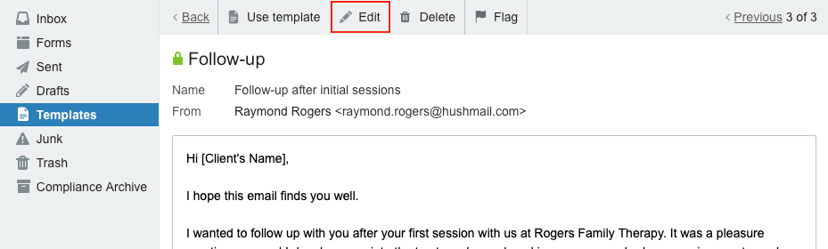
- Select a template from the list by clicking on it
- Once in the preview screen, select “Edit”
- Edit the template and save your changes
Saving a template
The system will autosave your changes as you edit your template. However, we recommend you double-check to ensure your work is saved after you have edited it.
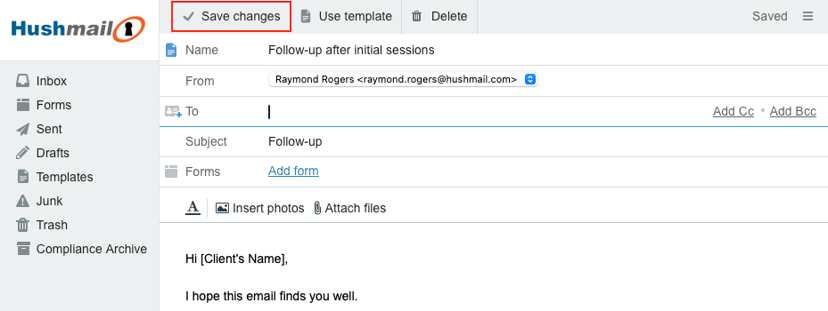
To save your work manually, click the “Save changes” button. If the template has already been saved, the button will be greyed out, and the text “✓ Saved” will appear.
Organizing email templates
As you add to your list of templates, you may want to organize them. Like other emails, you can sort your templates alphabetically or by date. You can also flag email templates or sort them into subfolders. From the “Templates” folder, you can expand the subfolders by clicking the > arrow.
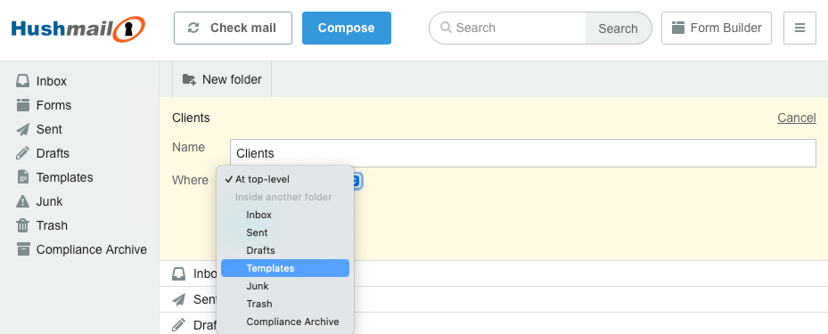
To create a subfolder:
- Click “Manage folders” on the bottom left-hand side of the screen
- Select “New folder”
- Add a name
- Choose a location by clicking the “Where” drop-down menu
- Select the “Templates” folder option
- Click “Save”
Preparing to send a template
Once a template is edited to your satisfaction, you can use it to send emails.
There are four ways to access saved templates to compose an email.
- From the compose email screen
- From the main templates screen
- From the template preview screen
- From the template editing screen
From the compose email screen
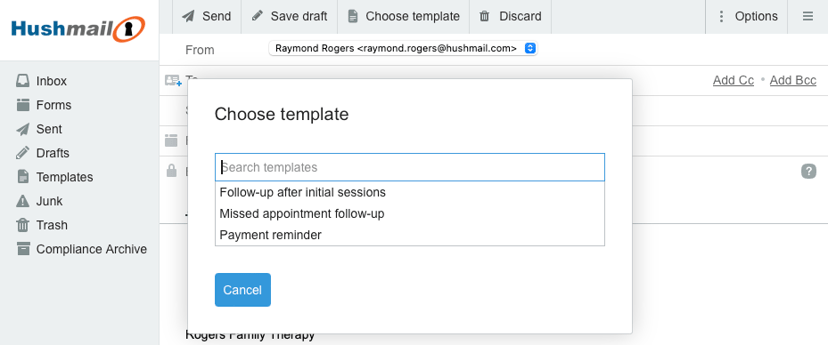
This process is basically the same as writing any other email in Hushmail.
- Click on the blue “Compose” button on the top left-hand side of the screen
- The system will open a blank email
- Click the “Choose template” button
- A list of your saved templates will appear in a drop-down menu
- Select the template you would like to use
The email will automatically populate with the template text, attachments, and any email addresses you added to the template
If you select a template in error, you can easily switch to another by clicking the “Choose template” button again and picking another template from the list. The template you chose first will be completely replaced.
⚠️ If you manually added an attachment, recipient, or form to the first template while on the compose screen, it would be retained after switching to the new template.
From the main templates screen
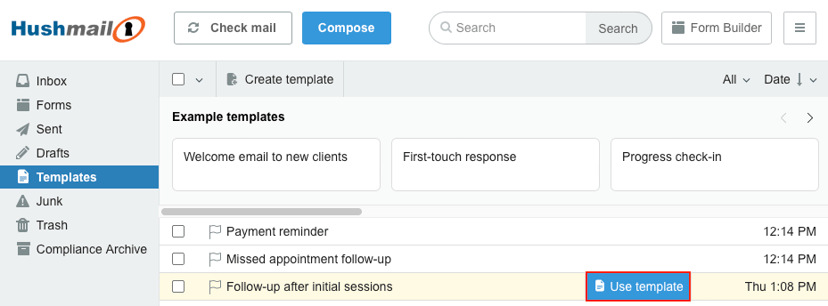
Follow these steps to send an email from the main Templates screen:
- Go to the saved templates listed directly under “Example templates”
- Hover the cursor over your desired template
- Click the “Use template” button
From the template preview screen
You can also send an email from the template preview screen.
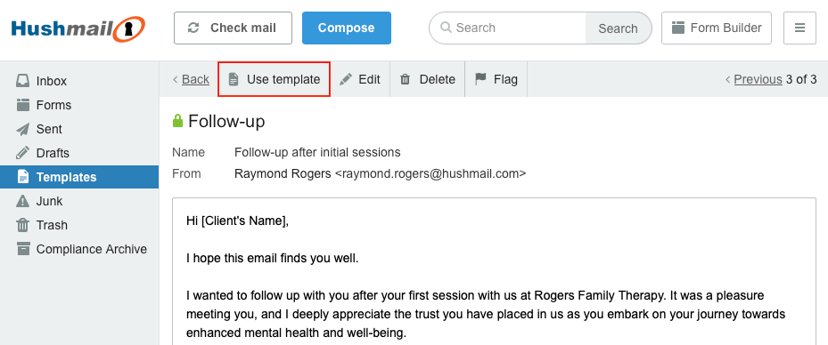
- From the “Templates” folder, select a saved template from the list
- The template preview will open
- Click the “Use template” button
From the template editing screen
Sending an email from the editing screen follows a similar process.
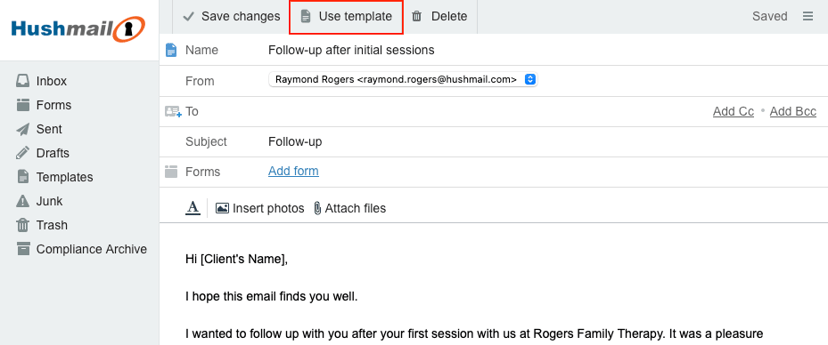
- Follow the instructions to edit a template
- Once your changes have been saved, click the “Use template" button
Sending your email
Once you have opened an email created from a template, there are just a few more steps to take before clicking “Send”.
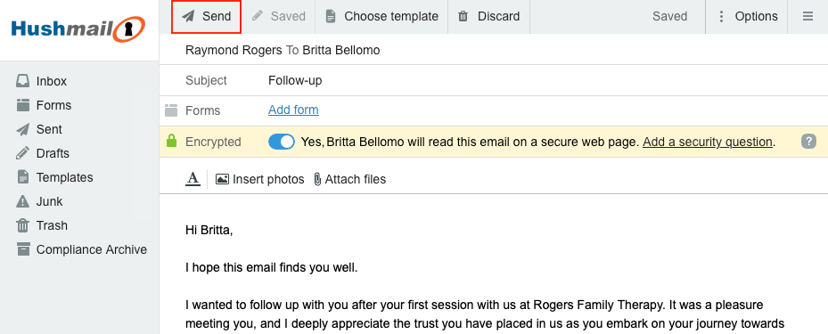
- Customize the email by looking for placeholders and updating the information accordingly (e.g., add the recipient’s name)
- Review the email to ensure the information is accurate and nothing has been missed
- Add the recipient’s email address
- Click the “Send” button
Want email templates and everything else Hushmail has to offer?


